Saturday, January 29, 2011
50th Birthday Party
A more appropriate title for this post might be, In Which I Pretend to Be a Party Planner. A good friend of my family celebrated her 50th birthday this weekend. I offered to help with the party, thinking I might make the invitations...maybe bring a plate of food...and ended up at the helm. This was a fun adventure for me. I've never hosted a party for 70. I admit I'm a total novice, but I sure had a good time pretending to know what I was doing.
The birthday girl wanted a medieval/royal/jewel-toned event. A crown with jewels became the decor element of the evening. If you click on the first photo above, you'll see that she penned a creative invitation to fit her theme.
Aside from the theme, the only other major request from the birthday girl was that she have a dessert buffet. One of the walls in the party room was covered in red velvet. I thought the dessert table would be placed in front of that wall - the red velvet making a nice backdrop - but no, the dessert table was set towards the back of the room. So please ignore the stacked chairs and tables in the background. Also, no need to watermark these photos, eh? No one's going to steal them. The lighting was terrible. This is the only somewhat decent picture I have without people in the background (who might not want their pictures posted).
Even with my bad photography, you can see how amazing these chocolate tortes are. The pastry chef who made these was also a guest at the party, so I wanted to give her credit for her talented work. Yes, these bundles of chocolaty goodness tasted as good - if not better - than they looked.
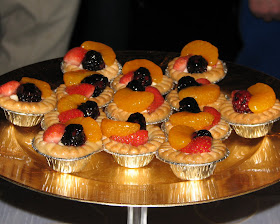
Colorful fruit tartlets.
I'm lovin' the candy-filled apothecary jar trend right now. Aren't they cute?
The birthday girl loves all things chocolate. So we dressed up a few chocolate staples from See's Candies: chocolate lollipops and...
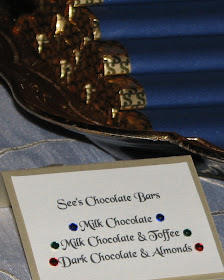
three flavors of chocolate candy bars. I saw more than a few ladies tuck a bar into their purse. I'm with you ladies - a little now, a little later.
The place cards. Yes, I adhered every rhinestone on every crown by hand. For days and days, while my son did his homework, I sat at the table beside him, gluing my little heart out. Between invitations, placecards, and food labels, I used over 700 rhinestones, all glued one at a time...by hand...with tweezers.
The menu tickets. Guests were offered a choice of three entrees. Each person took a tag to indicate his or her preference. I overheated my new Silhouette making these. *sniff, sniff* Fortunately my friend Heather came to my rescue and let me finish cutting on her machine. And for what it's worth - I give the customer service department at Silhouette America a big thumbs up. Response time was speedy and they didn't give me any trouble about returning my machine.
Finally, here I am beside the dessert table. The sweater disguises my prego belly well, but if you look closely, you can see all five months' worth of the sweet little girl growing inside of me.
Monday, January 24, 2011
Cards with Gray
Whew, it's been a long time since I posted cards. In honor of Moxie Fab World's Gray is the New Black Challenge, here are a few oldies that never made it to the blog-o. All feature the color gray, of course. Enjoy your day!
Supplies: You Make Me Wild Card
Stamp: You Make Me Happy.
Paper: (Basic Grey, Basic Black, River Rock) Stampin' Up!, pattern paper by HOTP.
Ink: black StazOn.
Accessories: ribbon, Thickers by American Crafts.
Supplies: Celebrate in Style Card
Sentiment printed with computer.
Paper: (Basic Gray, Going Gray, Very Vanilla) Stampin' Up!, Amy Butler Lotus mat pad.
Accessories: gray ribbon, Kiwi ribbon, Amy Butler Lotus Faded China Purse, rhinestone brads.
Supplies: Fly Fishing Card
Based off a template from kaboose.com: http://crafts.kaboose.com/fish-card.html.
All supplies Stampin' Up!
Notes: The fishing line is a paper clip that I reshaped. If you look closely, you'll see that I stitched it onto the card at the top of the "water line" and at the top fold of the card. I made the water waves by wrapping strips of paper around a pencil.
Homemade Christmas
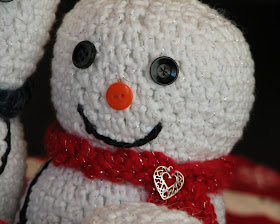
The Christmas trimmings have been packed away for weeks, but I'm finally making time to post all the sweet, handmade gifts we received this year. Up first, the snowman family my mom crocheted. The middle snowball represents the new baby due to join our family in May. It's wrapped up in a Christmas sock/blanket.
Love the little charm on my scarf. :)
The boys upgraded their snowmen from decorations to playthings.
We had a few weeks of playing Find the Snowman before bedtime every night because I was so afraid that if I went too long without knowing where each snowman was, we'd lose one for good.
My mom also made this game for the boys. It's a two-player game. Each player rolls the dice, then based on what they rolled, puts a star on the board beside the appropriate symbol. The first player to fill up his or her side of the game board wins.
Both boys loved it, especially my three-year-old, who packed the game to take to all his playdates last month. That's my mom on the left side of the picture. Hi Mom!
Next up is this cheery wall hanging quilted by my stepmother. My stepmom actually made this a year ago, but since I didn't post pictures at the time, late is better than never.
Look at the detail in her stitching. Giving the tree trunk and branches texture...
Outlining the berries...and also adding sparkly paint to make the snowflakes extra shimmery.
My friend Jacquie cross-stitched this sweet little ornament for us. When Jacquie came to visit a few months ago, she taught Brighton how to cross stitch. Bless that woman! Brighton may be a quick study, but she has the patience of a saint.
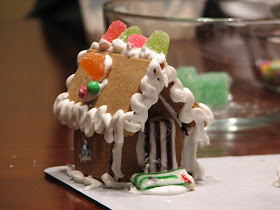
Last but not least, the most quintessential Christmas craft of them all: the gingerbread house.
The boys got good and sugared up decorating these little beauties. My mom bought the supplies when she came to visit and took this as her project with the boys. I was glad for the help. And for the opportunity to snitch all the spearmint gummies while no one was looking.