Welcome to my first tutorial! I've been making taggie toys for the precious babies being born to my friends and family over the past few months and thought I'd share intructions. This mini blanket is a great project for a beggining sewer (and a beginning tutorial maker). :)
Supplies:
- Two pieces of fabric. My fabric measured 14" x 18", but anything between 12" x 12" - 18" x 18" would work. You won't need to use measurements (hooray!), so just cut two rectangles that are the same size and you're ready to go.
- 12 or more pieces of washable ribbon, cut 5" long.
- pins, thread, sewing machine
1. Prepare you ribbon.

Cut coordinating ribbon into 5" long strips. You'll need 12 or more strips of ribbon for your mini blanket.

With your main fabric facing up, lay out strips of ribbon until you find an arrangement you like.

Fold the ribbons with the wrong sides together. Pin ribbons so the raw edges are even with the edge of the fabric.

close up of how to pin the ribbons
2. Place coordinating fabric on top with right sides together.

Make sure your ribbons are in the middle of the fabric sandwhich.

Pin fabric right sides together, leaving a hole for turning.

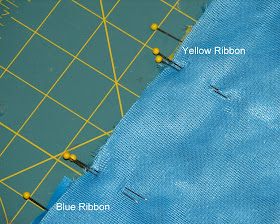
TIP: Make sure you leave the hole for turning between two ribbons. You want your sewing machine to secure the ribbons in place really well (wouldn't want Baby pulling them out, would you?). Here you see my double pins (how I mark where I want to stop and start sewing) between the edges of the blue and yellow ribbons.

Sew using a 1/2" seam allowance. Remember to leave a hole for turning the blanket right side out.

Clip the corners.
3. Turn and finish.

Turn so that the right sides are facing out. See all those cute loops of ribbon sticking out. :) Pin around the edges in preparation for topstitching.

TIP: Use a few extra pins where you left the hole for turning.

Topstitch 1/4" from edge. TIP: If your fabric has some stretch (like my minky fabric did), use a narrow zig zag stitch or a stretch stitch. TIP: Be sure to catch the raw ends of the ribbon in your topstitching. If you sewed with 1/2" seam allowance and are topstitching 1/4" from the edge, you're good. :) But if you did something different, you'll want to make sure you reinforce where the ribbons attach so Baby doesn't pull them out.

You're done! Look at your adorable, snuggly mini blanket and pat yourself on the back. :)
Alrighty, how'd I do? I'd love to make more tutorials, so help me make them worthwhile. I welcome all feedback, especially suggestions for improvement. Thanks, Rachel

thou almost persuadest me to have another little one...
ReplyDeletelove love love your baby gifts.
love it!! thanks for the tutorial.
ReplyDeleteSo cute, great Love this idea for all my ribbon scraps! Kinky always moves on me when I try to make blankets with it! Any tips?
ReplyDeleteHa, spellcheck made minky "kinky"!!!!!!
ReplyDeleteGood questions, Emily. I wish a had some great pearl of wisdom to share. I use quilting needles to pin my layers together (they're longer than regular needles and work well for thick fabric). Other than that, I've heard using a walking foot on your sewing machine really helps. Quilters swear by them. Good luck! I'd love to see if you make one.
ReplyDeleteRachel,
ReplyDeleteYour tutorial is excellent! I went to a 3-hour sewing group yesterday and made my first taggie blanket while I was there...and that included time for lots of socializing and snacks, too :) I'm so proud of my final product!
How can I send you a picture?
Hannah, hooray! I can't wait to see what you made! My email is r_defnet@frontier.com.
ReplyDeleteTip-instead of pinning each ribbon down, I use scotch tape and just run a long piece of scotch down each side to hold down the folded ribbon. When u sew, it's okay if you run over the tape bc it rips off. I find it quicker and more convenient than pinning.
ReplyDeleteI am brand new to sewing. I made two of these little blankies. I was so proud of myself. Thanks for the tutorial. It was so easy to follow. I had a blast.
ReplyDeleteThese are super easy and make wonderful gifts! Warning, though, to any of you thinking about making them for sale. The original Taggie is patented and she goes after people who infringe on her patent.
ReplyDeleteSo, I'm a "MeMa" five times over and wanted to make one for the newest member of our family. Been years since I sewed anything and your instructions were clear, precise and user friendly.
ReplyDeleteThe pictures helped a LOT!
Thank you for sharing your know how!
Great, easy to follow tutorial. I made two of these in a jiffy for my grandson.
ReplyDelete