Thursday, September 23, 2010

TUTORIAL: Goomba - Part 3

If you're new here, welcome! Please check out Part 1 and Part 2 of my Goomba costume tutorial. If you're already up to speed, read on.

Now that you've made the Goomba's face, set is aside. Completely aside. As in, go put it upstairs or in a closet or somewhere you will not be tempted to touch it. You won't need it for this part of the tutorial. (I'm being redundant on purpose. I start talking about a lot of different body parts - fronts and backs - and I don't want you to think I'm talking about the face. I'm not. I promise.)

Supplies for Part 3
  • 2 Goomba body pieces.
  • 4 pieces of light brown felt measuring 4" x 10".
  • Sew-in Velcro.
  • 6 Snaps, snap setter, hammer. Or you could use bits of Velcro.
  • thread, pins, scissors, sewing machine
1. Make straps.

Start with 4 pieces of light brown felt (same color as the body of your Goomba) each measuring 4" x 10".


Pin 2 rectangles together. Sew around 3 sides, leaving the top (a short side) open for turning. Clip corners. Repeat with the other two rectangles.


Turn and pin. Be sure to turn under the edges where you left the hole.


Topstitch. TIP: Make sure you stitch close enough to the edge that you sew the hole closed.

2. Add Velcro.

I'll try to explain the big picture of what we're trying to do, then I'll break it down. We're going to stitch the straps to the front of the Goomba. Then we're going to add Velcro so that the ends of the straps will attach to the back of the Goomba.


Here's a picture of the finished costume. If you look closely, you'll see that the straps are sewn to the front of the Goomba. There are two strips of Velcro at the end of the straps, which line up with two strips of Velcro on the back of the Goomba.

Now for the breakdown...


First, grab two body pieces. One will hang on the front of your child, the other will hang on the back. It doesn't matter which piece you use for the front and which you use for the back, but if your felt has a right side, you want the right sides touching your child's body, not facing out.

Pin the straps in place so that they fit your child and sit comfortably on his or her shoulders.

Use a fabric marker or chalk to mark where you want your strips of Velcro. Remember, Velcro has two parts (hook and loop), so be sure to mark where you want your Velcro on the ends of the straps and on the back side of the Goomba.
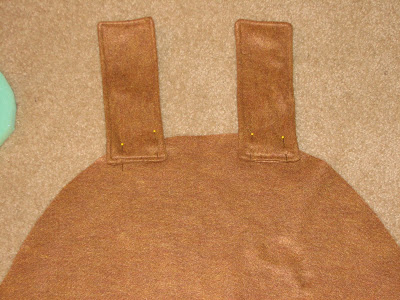

Lay out the front half of your Goomba and adjust if necessary. Based on where you pinned the straps, your straps should be in roughly the right place. But you'll want to make sure your straps are parallel, the same distance from the edges, etc. Stitch the straps in place.


Pin strips of Velcro to the back of your Goomba. TIP: Be sure that all the strips are either loop OR hook, not a combination. I suggest using loop for this part. Stitch Velcro in place.


Sew Velcro to the straps. If you used loop on the back of the Goomba, use hook on the straps.


You should have two pieces that look like this.

3. Add snaps. (Or if you don't have snaps, you could use bits of Velcro.)

Add six snaps to the costume - three on the left side, three on the right. TIP: Be sure you leave enough room near the top for you child's arms.

Your snaps will come with instructions on how to set them. TIP: If this is your first time using snaps, you'll need to buy two things. 1) A package of snaps. 2) A setting tool that fits your snaps. They're usually shelved next to each other, but I'm sure someone at the fabric store can also help you find them.

The picture above show the back half of the Goomba. Feel free to zoom in to check the details.


Here's a picture of the front half. Wire clippers...hammers...you didn't know sewing involved such manly tools, did you? ;-)


You should now be able to attach the front half of your Goomba to the back. (Snap the snaps and Velcro the Velcro.) This is what your Goomba should look like from the front.


Here's a photo of the back.

This was the hard one. If you made it through this part of the tutorial, give yourself a pat on the back...eat some chocolate...do whatever you want to celebrate! I apologize if some of my instructions were unclear. This was hard to explain! Hopefully the pictures helped and your good ol' know-how carried you the rest of the way. We're almost done! Please click here for Part 4 of the tutorial.

TUTORIAL: Goomba - Part 2

In Part 1, I showed you how to make the pattern pieces for your Goomba. Now we're going to use those pattern pieces to make the Goomba's face.

Supplies for Part 2
  • Light brown felt for the body. I used about 1 1/2 yard of 72" wide felt.
  • White felt for the eyes and fangs.
  • Black felt for the eyes and mouth.
  • Black faux fur for the eyebrows. Or you can use black felt.
  • Four black pipe cleaners.
  • Wire cutters.
  • Pattern piece for your Goomba's body. (See Part 1)
  • Pattern pieces for the eyes, eyebrows, mouth, and fangs. (Print from Part 1)
  • thread, scissors, hand sewing needle, pins, sewing machine
1. Cut fabric pieces for the face.
Use the pattern pieces to cut out the fabric for your Goomba's face. For you visual folks, here's a picture of the finished face so you can see what you'll need. Here's the same info in list form:
  • 2 large white ovals for the eyes.
  • 2 black ovals for the eyes.
  • 2 small white circles for the eyes.
  • 2 eyebrows. (see tip below)
  • 2 white fangs.
  • 1 mouth. (see tip below)
  • 4 Goomba bodies. NOTE: You only need 1 Goomba body for the face, but you'll need 4 body pieces for the entire costume.

TIP: Faux fur has nap, meaning that if you look at the fabric, the fur points in a certain direction. Make sure you line up your pattern pieces such that when you cut your right eyebrow, the fur points to the right. Then flip over the pattern so that when you cut your left eyebrow, the fur points left.

In the picture above, the nap is pointing down. See those long hairs hanging off the bottom? That's how you can tell that the nap is pointing down. If you look closely, you can see how I laid out my pattern pieces to make sure the nap points in the correct direction. Warning: When you cut faux fur, be prepared for a flurry of scrap fur to cover your workspace. Try to only cut the fabric backing, not the fur itself. Still, arm yourself with a Swiffer or a vacuum cleaner. You'll need it.


TIP: To cut the mouth, fold a piece of black felt in half. If you look at the pattern for the mouth, I marked for one edge as "place on fold". You guessed it - place that edge on the fold of the fabric. Cut out the mouth, cutting only the three sides that are NOT on the fold. You should now have one long, skinny, symmetrical mouth.

2. Applique the eyes to your Goomba's body.

First sew the small white circles onto the black ovals.

TIP: When appliqueing several layers, start at the TOP layer and work your way down. In this case, the top layer is the tiny white circles. You may be tempted to sew the big white ovals onto the Goomba's body first...DON'T. By the time you add the black ovals and then the white circles on top, you'll be sewing through four layers of felt! NO, no, NO!


Sew the black ovals onto the white ovals.


Sew the white ovals onto the Goomba's body. (See how you never had to sew through more than two layers of felt?)

TIP: I appliqued the eyes using a narrow zig zag stitch. I started using a straight stitch (which could work, if that's what you prefer), but I found a zig zag stitch was more forgiving where I sewed around the curves.

3. Sew the mouth and fangs to the Goomba's body.

Make sure the bottom of each fang is flush against the mouth.

4. Sew the eyebrows to the Goomba's body.

If you look at the picture of a Goomba, its eyebrows stick out past the sides of its head. To make this work for our costume, I hand sewed pipe cleaners to the back of the eyebrows. (Otherwise the fabric was too floppy.)

For each eyebrow, cut two pipe cleaners and shape them to fit the arch of the eyebrow.


Hand sew the pipe cleaners to the back of the eyebrow. I drew a diagram so you could see approximately where I tacked down the pipe cleaners...(keep reading below)
If you click on the picture, you might be able to see what I did. Black on black stinks for tutorial making...but it's fantastic for the actual costume where you don't want the pipe cleaners to show. TIP: When sewing, try not to catch any of the fur under the thread. Just stitch the pipe cleaner to the back of the fabric.


Sew the eyebrows onto the Goomba's face. A zig zag stitch works best. Only sew along three sides (see photo below). Do not sew where the eyebrows hang off the edges. (It's hard to explain why, but trust me - it will be a big pain later if you do.)

TIP: When sewing, push the fur to the side so that you're sewing the fabric (not the poofy fur) to your Goomba's face. This keep the fur from getting tangled in your machine or matted down by the thread.


This is the back side of the Goomba's face. (I know, I can't believe I'm showing it.) If you click on the picture, you can see where I only stitched along three sides of each eyebrow.


Ta-da! Here's your Goomba's face. Those eyebrows and scowl look so perfectly angry, I can't help but smile.


Now let your child hold it up and get excited - it's starting to look like a costume!

Please click here for Part 3 of the tutorial and click here for Part 4.

Friday, September 17, 2010

TUTORIAL: Goomba - Part 1


Welcome to my tutorial on making the world's most innocent video game villain: a Goomba! To remind all the grandparents out there - this is a Goomba. He waddles around the Mario Brothers games waiting to get bumped into or stepped on.

First, let's fast forward to see what the body of our Goomba costume is going to look like. Sometimes it helps to know where we're headed.


Now let's make our pattern pieces.

Supplies for Part 1
  • Large sheet of paper, such as bulletin board paper or newspaper taped together.
  • Large sheet of 1/2" thick foam.
  • Pencil.
  • Sharpie.
  • Scissors.
  • Pattern pieces for facial features printed onto computer paper. See below.
  • Optional - black paper.
1. Make pattern for the body.

Using a big sheet of paper, pencil out the shape of your costume so that it fits your child. Think mushroom. For my six-year-old, my Goomba is 25" tall x 34" wide at its widest point. TIP: I used a scrap of bulletin board paper from a teaching supply store. You could also tape together newsprint to make one large sheet of paper.


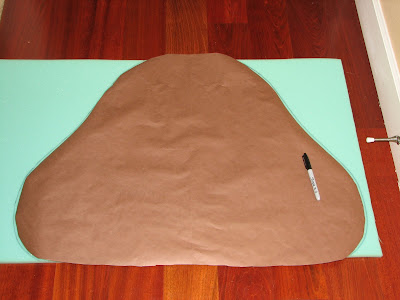
Here I've sketched out the pattern for the body, cut it out, and am laying it on top of my son to check the fit. TIP: Fold the body in half side-to-side and make any necessary adjustments to ensure the body is symmetrical on the left and right sides.

2. Cut foam inserts for the body.

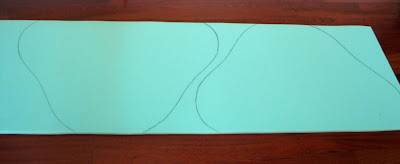
Trace body pattern onto a thin sheet of foam. Here my pattern was slightly taller than my foam - that's okay. Since fabric requires a seam allowance, you need your foam slightly smaller than your fabric anyway.


Remember, our Goomba has a front and back, so you'll need two pieces of foam for your costume - one for the front and one for the back.


Cut out the foam body pieces.

3. Make pattern pieces for the facial features.
Now this is where I remind you that here in Blogland, you get what you pay for. And this tutorial is free. So please be nice about my hand drawn pattern pieces. :) Each picture fits a full 8.5 x 11 sheet of paper, with the eyebrow and mouth going edge to edge. If you made your Goomba's body larger or smaller than mine, you'll want to scale your facial features accordingly.

To make your patterns for the eyes, cut out two of each shape. TIP: To help me visualize the face and make sure I had my proportions correct, I cut the pieces out of colored paper (see photo below). Everything that was supposed to be white, I cut out of white paper. Everything that was supposed to be black, I cut out of black paper. Remember, you'll use felt on the actual costume; these are just the pattern pieces.


Cut out even more pattern pieces... (I'll explain the place on fold comment when I get to Part 2 of the tutorial.)


Lay your pattern pieces on top of your foam to make sure you're happy with the proportions. Make adjustments if necessary.

Alrighty folks, that's it for today. Click here for Part 2 of the tutorial, click here for Part 3, and click here for part 4. Also, my entire family is dressing up as characters from Super Mario Bros. this Halloween, so you may get lucky and I'll still have enough time and willpower to post a tutorial on making Toad, Mario, Luigi, and Princess Peach. Okay, maybe if you're really lucky. ;-)

Thursday, September 16, 2010

I'm Published!


This is one of the three cards published in Holiday Cards & More, a publication of Paper Crafts magazine. A 3 for 3 publication record is unheard of, so I count myself both blessed and lucky.


Hey Mom and Dad, you can pick up a copy of the magazine at places like JoAnn's and Barnes & Noble. My cards are on pages 12, 13, and 21.

In other happy news, I have a project accepted by Simply Handmade for their upcoming December/January issue.

Friday, September 10, 2010

Sneak Peek: Goomba


Yes, I am amazing. I finished Brighton's Goomba costume on Labor Day. Labor Day! As in, 56 days before Halloween. That's gotta be a new world record.

As soon as I squeeze in time to finish the tutorial, I'll post it. 'Til then, please enjoy this photo of me sewing faux fur. It wasn't nearly as scary as I thought it would be.