
Now that you've made the Goomba's face, set is aside. Completely aside. As in, go put it upstairs or in a closet or somewhere you will not be tempted to touch it. You won't need it for this part of the tutorial. (I'm being redundant on purpose. I start talking about a lot of different body parts - fronts and backs - and I don't want you to think I'm talking about the face. I'm not. I promise.)
Supplies for Part 3
- 2 Goomba body pieces.
- 4 pieces of light brown felt measuring 4" x 10".
- Sew-in Velcro.
- 6 Snaps, snap setter, hammer. Or you could use bits of Velcro.
- thread, pins, scissors, sewing machine

Start with 4 pieces of light brown felt (same color as the body of your Goomba) each measuring 4" x 10".

Pin 2 rectangles together. Sew around 3 sides, leaving the top (a short side) open for turning. Clip corners. Repeat with the other two rectangles.

Turn and pin. Be sure to turn under the edges where you left the hole.

Topstitch. TIP: Make sure you stitch close enough to the edge that you sew the hole closed.
2. Add Velcro.

I'll try to explain the big picture of what we're trying to do, then I'll break it down. We're going to stitch the straps to the front of the Goomba. Then we're going to add Velcro so that the ends of the straps will attach to the back of the Goomba.

Here's a picture of the finished costume. If you look closely, you'll see that the straps are sewn to the front of the Goomba. There are two strips of Velcro at the end of the straps, which line up with two strips of Velcro on the back of the Goomba.
Now for the breakdown...

First, grab two body pieces. One will hang on the front of your child, the other will hang on the back. It doesn't matter which piece you use for the front and which you use for the back, but if your felt has a right side, you want the right sides touching your child's body, not facing out.
Pin the straps in place so that they fit your child and sit comfortably on his or her shoulders.
Use a fabric marker or chalk to mark where you want your strips of Velcro. Remember, Velcro has two parts (hook and loop), so be sure to mark where you want your Velcro on the ends of the straps and on the back side of the Goomba.
Lay out the front half of your Goomba and adjust if necessary. Based on where you pinned the straps, your straps should be in roughly the right place. But you'll want to make sure your straps are parallel, the same distance from the edges, etc. Stitch the straps in place.

Pin strips of Velcro to the back of your Goomba. TIP: Be sure that all the strips are either loop OR hook, not a combination. I suggest using loop for this part. Stitch Velcro in place.

Sew Velcro to the straps. If you used loop on the back of the Goomba, use hook on the straps.

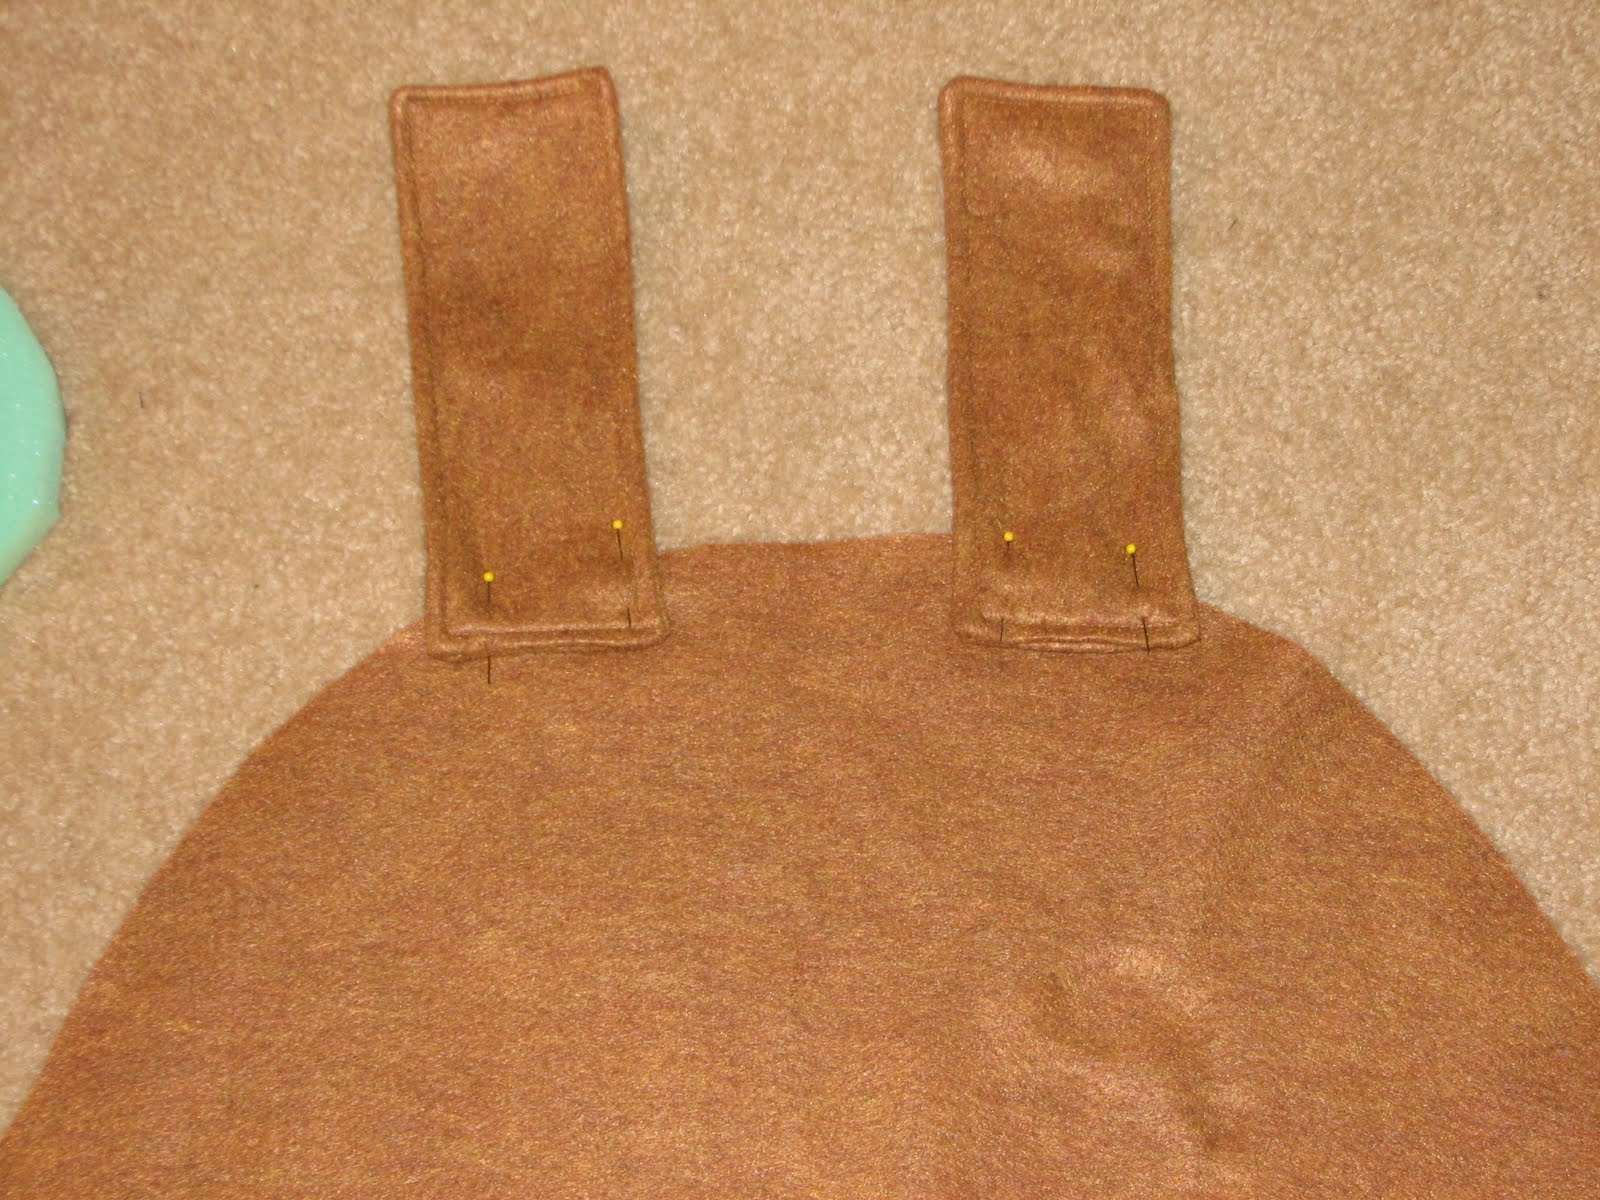
You should have two pieces that look like this.
3. Add snaps. (Or if you don't have snaps, you could use bits of Velcro.)

Add six snaps to the costume - three on the left side, three on the right. TIP: Be sure you leave enough room near the top for you child's arms.
Your snaps will come with instructions on how to set them. TIP: If this is your first time using snaps, you'll need to buy two things. 1) A package of snaps. 2) A setting tool that fits your snaps. They're usually shelved next to each other, but I'm sure someone at the fabric store can also help you find them.
The picture above show the back half of the Goomba. Feel free to zoom in to check the details.

Here's a picture of the front half. Wire clippers...hammers...you didn't know sewing involved such manly tools, did you? ;-)

You should now be able to attach the front half of your Goomba to the back. (Snap the snaps and Velcro the Velcro.) This is what your Goomba should look like from the front.

Here's a photo of the back.
This was the hard one. If you made it through this part of the tutorial, give yourself a pat on the back...eat some chocolate...do whatever you want to celebrate! I apologize if some of my instructions were unclear. This was hard to explain! Hopefully the pictures helped and your good ol' know-how carried you the rest of the way. We're almost done! Please click here for Part 4 of the tutorial.
not only did you do an amazing job on the goomba, but your tutorial rocks as well!!!
ReplyDeleteI love this thank you! I have been looking for a little while now to try to find something that shows how to make a goomba costume. You explain it so well also. I am wondering though if you think it'd be easy to make it into like a bunting costume for my 9 month old? Thank you again so much!
ReplyDeleteWhat type of foam did you use? Thank you.
ReplyDelete