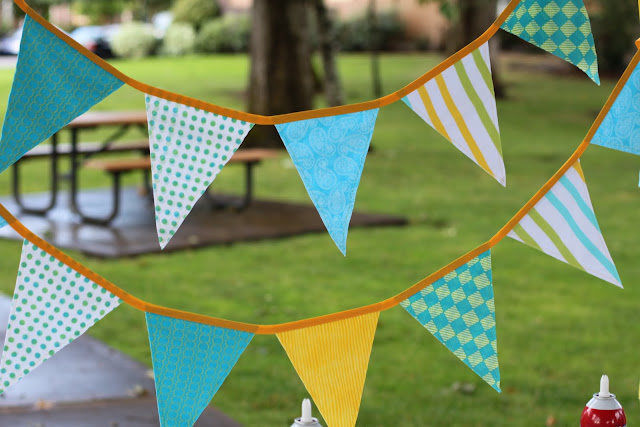
Supplies
- Fabric. I used 1/4 yard cuts of 5-6 different patterns.
- Extra wide double fold bias tape. 2-3 packs.
- If you don't have a way to hang your banner, 2 wooden dowels, spray paint, and vases/pots filled with pea gravel or something else heavy.
- Standard sewing supplies: thread, rotary cutter, straight edge, sewing machine.
1. Cut your fabric.
For this banner, I used six patterns of fabric. When buying fabric, you'll need 1/4 yard each. TIP: Make sure you buy enough fabric to have 1/4 yard after it's squared. If the fabric is cut crooked, you might want to buy 3/8 yard. You do NOT need to prewash the fabric. The striped fabric on the left is a dishcloth I found at Target. Since it's a big rectangle, I cut it the same way as the other quilting fabric. (I bought additional dishclothes and used them as a table runner.)
Iron your fabric. Fold your fabric in half wrong sides together so that the selvage edges are touching. Square the top and bottom edges and cut off the selvage. Cut your fabric 9" tall (1/4 yard).
Cut your pennants as shown above. Each pennant is 9" tall (the height of your fabric) x 7" wide. If it helps you to mark your fabric, start at one edge and mark along the top every 7". Starting from the same edge, mark the bottom at 3 1/2", then continue marking every 7". Use a straight edge and rotary cutter to make straight cuts.
Remember, you should be cutting through two layers of fabric. As you cut your pennants, keep each pair of pennants stacked neatly on top of one another other so they're ready to be sewn together.
2. Sew each pennant.
Take your pennant triagles - each with a front and back piece of fabric, right sides facing out - and sew them together along the two long edges. You'll sew the top together when you add the bias tape. Sew close to the edge, about 1/4" - 3/8". The exact measurement isn't important. I moved my needle to its far right position and lined up the edge of the fabric with the edge of my presser foot.
TIP: Start at the top (where a long edge meets the short edge) and sew down to the bottom point. When you get to the point, leave the needle in your fabric, then turn your fabric to sew along the other long edge. This will give a nice, sharp point to your pennant.
You do NOT need to backstitch (staystitch) at the ends. You'll catch these threads when you add the bias tape.
3. Sew the pennants together with bias tape.
Lay out your pennants in whatever arrangement you like.
I spaced my pennants 1" apart. Feel free to adjust the spacing however you wish. If you don't have a lot of fabric but need to fill a lot of space, spread your pennants farther apart. Conversely, you could sew the pennants with the top edges touching so there'd be no space between them.
Pin each pennant inside the fold of the bias tape. TIP: Leave a tail of bias tape on each end for hanging up the banner. I left a 12" tail of bias tape.
Sew the bias tape onto the pennants. Be sure to catch both the front and back layers of bias tape when you sew!
Your banner is done. Admire it and smile! If you need a way to hang your banner on a table, like I did, keep reading.
4. Prep dowels for hanging your pennant banner.
Cut your dowels to desired height, if necessary.
Use spray paint to paint the dowels. I painted mine a sunny yellow to coordinate with my fabric.
Fill flower pots (or the container of your choice) with pea gravel. Insert the dowels and hang your banner.
Enjoy your party!


Swoon! I am in love.
ReplyDeletethis is an awesome tutorial Rachel - I've bookmarked it and I'm totally going to give this a try!!
ReplyDeletethanks! Here is the link to my pennant, and I referred back to your tutorial! Super easy!!! :-) I'm planning on making another too!
ReplyDeletehttp://singsinganewsong.blogspot.com/2011/09/mondays-project-fabric-pennant.html
Did you have any problems with the pots tipping over? I have a kids party I want to try this with but I'm concerned that it isn't too stable. I tried it out on the ground but it was not too stable. Any other ideas? I'm wracking my brain!
ReplyDeleteAlesha, my first attempt used small flower pots and full-length dowels, and YES they tipped over. So I switched to taller vases and cut a few inches off the dowels. Then everything worked well. Good luck!
ReplyDeleteI love your idea. My daughter wants the pennants for her nursery. We have a tradition of making a family quilt for a new baby, but she would rather have the pennants. Here's my question: On the quilt, each person gets to create one fabric square which I put the trim on and quilt them together. With the pennant, my daughter wants one side to be what the people create, and the other side to be a different fabric. Can I make the triangles with sewing the left sides together and turning them inside out? Or would the points not come out right? Also what could I put between the two fabrics so the pattern of the fabric doesn't show through the white decorated fabric. I'll attach a picture of the quilt if I can so you see what I mean.
ReplyDelete