Saturday, March 17, 2012

Angry Birds Birthday Party


Lincoln celebrated his birthday with an Angry Birds-themed party.  For weeks I asked friends and neighbors to save large boxes so we could build this beauty - a live action version of Angry Birds

Behold boxes and pigs.  We modified a water balloon launcher to fit playground balls, a.k.a. the angry birds.

We bought rubber playground balls and painted them to look like angry birds.  More accurately, Ben painted.  I wish I could take credit, but I just bought the balls.  I sprayed two coats of sealant over the painted area, but I don't think the sealant did much good.  After a few days of playing with the balls, the bird paintings are pretty well chipped off.  At least they looked great for the party.

The red bird.

Sorry for the awkward crop.  Almost all of my party photos have other people's children in them, so no go for the blog-o. You'll have to trust me that this super cute kid has gorgeous eyes, because he does.

We used green balloons for the pigs.  Ben filled each balloon with a scoop of sand to weigh it down before inflating it.  Artistic credit again goes to Ben.

I bought the long, thin boxes at the Container Store.

 The kids loved knocking down the pigs and rebuilding with the boxes.

The kids had enough fun playing Angry Birds outside that the indoor portion of the party was pretty minimal.

We had a golden egg huntThink Easter egg hunt.  I bought a pack of gift bags at Target and added tags with pictures of Angry Birds.  The children used these bags to hold their eggs during the hunt.

If you look to the right of the gift bags, you'll also see a pile of small rubber balls.  I bought balls for each child at the dollar store.  We started the party by building small versions of the Angry Birds game indoors.  We had stations of things the children could use to build towers - wooden building blocks, Jenga, Lincoln Logs, Solo cups, you name it.  Then we had a variety of small balls - Nerf balls, small rubber bouncy balls, etc. that the kids could roll - ROLL - at their towers.  No, I did not allow 12 kids to throw balls in my house.  Though of course a few had to try it anyway.

I bought a pack of Angry Birds mylar balloons on Amazon and had them filled at my local grocery store.

Lincoln wanted cupcakes instead of a traditional cake.  Gotta love easy.  Find the printables from Sherry K Designs HERE.

I printed each Angry Bird large enough to fill an 8.5x11 piece of paper, then cut out the birds and strung them together to make a banner.

Angry Birds t-shirt tutorial
And of course the birthday boy wore his new Angry Birds t-shirt.  Find my DIY tutorial HERE.

Friday, February 24, 2012

TUTORIAL: Angry Birds T-shirt

Preparations are in full swing for this handsome little man's Angry Birds-themed birthday party.  I surprised him with this t-shirt to wear on the big day.  Here's the DIY tutorial.


Supplies
  • Image of Angry Bird - see below to print your own
  • Red t-shirt
  • Small pieces of black, white, and yellow knit fabric
  • Paper-backed fusible web, such as Wonder Under or Heat 'n Bond Lite (I used Heat 'n Bond but either product will work.)
  • Optional: transfer paper (tracing paper) and stylus or pencil
  • sewing machine, thread, scissors
  • iron and ironing board
1. Print image of Angry Bird onto computer paper.
Right-click on the image above to save it.

Crop and size the face to fit your t-shirt.

Print your image.  I printed the face large enough to fill an entire 8.5 x 11 piece of computer paper.

2. Fuse fabric to Heat 'n Bond Lite.
Use your Angry Bird picture as a guide to know how large to cut each piece of fabric.  TIP: It's easiest to use one square of black large enough to cut everything black, one square of yellow large enough to cut everything yellow, and one square of white large enough to cut everything white rather than use a seperate piece of fabric for each piece of the applique.

Cut your Heat 'n Bond slightly smaller than your fabric.  This prevents the adhesive on the Heat 'n Bond from sticking to your ironing board.  Follow the directions that came with your Heat 'n Bond to fuse it to the wrong side of your fabric.

3. Trace and cut shapes for your Angry Bird applique.
If you have transfer paper (tracing paper), lay it face down on the right side of your black fabric.  TIP: If you're worried about the tracing paper leaving marks on the finished product, flip over the black fabric and trace the image on the wrong side (onto the paper part of the Heat 'n Bond).  Your image will be reversed, but you're guaranteed to not see any marks from the tracing paper.

Use a stylus or the plastic tip of a mechanical pencil to trace the outline of the black face background.  Press hard enough for the transfer paper to leave an image on the black fabric.

NOTE: If you do NOT have transfer paper, simply cut the image with scissors and trace around eaach piece.  Cut around the black backround first, then trace.  Then cut out each piece of the face and trace each one individually.

Here's what the outline looks like.  Cut out the face, then use the rest of the black fabric to make the pupils for the eyes.

Repeat the process for each piece of the face.  You should have:
  • Black background
  • Two black pupils for the eyes
  • Two pieces of white fabric for the eyes
  • White fabric for the teeth/mouth
  • Two yellow pieces for the beak

4. Fuse each piece of the bird's face to your shirt.
Peel the paper backing off each piece of fabric.

Follow the directions that came with your Heat 'n Bond to fuse the face to your shirt.  Fuse the pieces IN THIS ORDER (you're working from the bottom up). 
  • Fuse the black background onto the t-shirt.
  • Fuse all the white and yellow pieces onto the black.  You can do all five pieces at the same time.
  • Fuse the black pupils onto the white eyes.
If you try to adhere all the pieces at once, the bottom pieces won't get hot enough to stick to the shirt unless you overheat the top pieces.  TIP: If you got eager and put everything on the t-shirt and started ironing, don't worry.  Check the edges of your applique to see how well everything adhered to your shirt.  If you have small patches of the bottom pieces that are loose, go ahead and sew down the applique (see below), then turn the shirt inside out and try setting the Heat 'n Bond from the inside of the shirt.

5. Sew around each piece of the applique.
Use a zig sag stitch to sew around the edges of each pieces of the applique.  I used thread that matched each piece - yellow thread on the beak, white on the eyes and mouth/teeth, and black for the pupils and background.

If my presser foot looks funny, it's because I used a clear applique foot so I could see my work more easily.  A regular foot will work just fine.

Here were my settings.  Stitch width = 2.7.  Sitch length = 2.0.  I used short, overlapping stitches to secure the ends.  TIP: It's important to use a zig zag stitch, not a straight stitch, since knits need to stretch.

Iron the shirt one last time to set the stitches.  Then voila! - you're done!


Please leave a comment if you make a shirt (or tote bag, or towel, or whatever else you want to applique) using this tutorial.  I'd love to see your good work!

Wednesday, February 1, 2012

Image Credits and Watermarks

In my best motherly voice:

Gather 'round, children. Let me give you a lesson on blogging.

The first thing to know about blogging is this: always, always watermark your photos.

Second and probably most important, if you use a picture from another source, you MUST give credit.  Or eventually someone will flood you with nastygrams, threaten you with bloodsucking lawyers, and complain about you to all of their friends.

Case in point:  See this cheery Valentine?  I posted it back in 2009.  That was back when my blog was even smaller than it is now and I never thought about watermarking my photos.  (For the sake of today's post, I dug up the photo and added the watermark.)

Fast forward to today.  A national retail craft chain included my card in this inspiration board.  You likey these Valentines?  We carry supplies for you to make your own!  Buy now!  Nevermind that the inspiration board is a bit of a hack job, the problem is that the retailer removed the artists' watermarks, altered the photos, and failed to compensate, credit, or even notify the artists.  In my case, my photo didn't have a watermark, but someone did lift it from my blog.  (The bright red lines were added by the lady who sent this screenshot.)

Yes, I know people post other people's pictures on their blogs all the time.  But for a retailer - who has a marketing department, social media staff, and a legal advisor - to post someone else's photos is a different situation in my book.  Retailers should know better.

Craft stores publish project ideas all the time.  The difference is this: projects created for publication are created by designers who receive compensation for their work.

Of course I like sharing my work; that's why I blog.  But if people use my idea - either to re-post the original work or use it as inspiration for a different project - I always appreciate receiving credit, especially with a link back to the original post.  I try to do the same for others.

If I'm being honest, I'm more flattered than offended.  I don't blog to make money.  I like sharing ideas and borrowing ideas that others have shared.  The fact that someone noticed my card and liked it enough to think they could make money with it makes me smile.  What's even more amusing is that they used my lousy picture.

Finally, I'm most amazed at the people who hunted me down and told me about my card.  Either I have more loyal blog followers than I thought or your sleuthing skills are amazing.  Either way, thank you!  Though I don't care to take action beyond this post on my blog, I appreciate others looking out for my interests.

So, consider today's lessons learned.  1) Watermark your photos.  2) Give credit where credit is due.

Should I end with an amen?

ETA - the retailer has apologized and removed the image.

Friday, December 9, 2011

Car Seat Cover + Canopy {skulls and camo}

I recovered a carseat for this supremely talented cake artist / chef / all-around-Renaissance mother-to-be.  You should check out her cakes.  She's no longer baking for the public, but she could win any cake-off on Food Network.  A cake-off is like a face-off, but with cake.

I LOVE the fabrics she chose.  Camoflauge skulls.  Seriously, when have you seen a carseat with camouflage skulls?  Never.

Until now.

What makes the fabric choice doubly amusing is that the parents are the nicest, most peaceful adults you'll ever meet.  The fabric is as hard-edged as this baby's ever gonna get.


Baby Boy will rest on soft brown minky while peering up at the calming yoga phrases covering the underside of the canopy: peace and love, relax, breathe, stretch.

I also give myself kuddos because the skull fabric is a knit. Yes, stretchy knit. When I sent Mom-to-Be to the fabric store with her shopping list, it never occured to me to tell her to get a woven fabric, preferably from the quilting section. Duh me. Knits are so soft - no wonder she loved the fabric.

As you can see, the end result looks great. I practiced first, then sewed slowly. Several of the pieces, like the canopy, reversed to the yoga print, which is a tradtional woven quilter's cotton.  It was much easier to work with the knit + woven pinned together because the woven kept the knit from stretching as much.

I made a matching tent/canopy to protect Baby Boy from wind, rain, and peering eyes.  Notice the rounded corners and brown piping.  Details like that make such a difference to me.

The straps around the carseat handle hook together with velcro.  The buttons are purely decorative.

For more details on construction OR to see the pinkified carseat cover I made for my daughter, CLICK HERE.

Wednesday, September 21, 2011

Made for Charlotte: Poncho, Cloche, and Ballet Slippers

My mom has amazing crochet skills, I tell ya.  Thank you, Mom!  Thank you, thank you, thank you!

My most favorite part of the outfit - the shoes.  The colors, the styling, the flower and leaves...I love it all.

Here's my mom with Charlotte Rose, all fancied up in her new poncho, cloche, and slippers.  Funny - when my mom told me she made a cloche, I had to look it up.  "Cloche" sounds so much more fashionable than "beanie," don't you think?  My mom has since sent a larger cloche for Charlotte, since this first one was was a bit snug.

Let's have one more look at those shoes.  My mom used this pattern from The Lovely Crow.  Did I tell you how much I love the shoes?  Love them.  Mom, will you please make me a grown up pair of these for Christmas?

Wednesday, August 17, 2011

Warmest Birthday Wishes

*This is my second post for today. To see the pennant banner tutorial, please scroll down.*


This has to be one of my favorite cards I have ever made. I love all things felt and those fuzzy mittens turned out really cute, didn't they?   I made sure to save the pattern I drew so I can make more of these cheery little mittens later on. The red felt is glittered - hence the little speckles in the photo.


I made the card for my stepmom's birthday a couple of years ago. When I saw the latest Moxie Fab World Challenge: Fabulous Felt, I knew I wanted to repost it.


Another one of my favorite cards with felt is this happy little tree.  (Anyone else remember watching Bob Ross?)


The tree was a ready-made creation by Basic Grey, but I still think it's adorable, especially all dressed up with these papers and ribbon.

Supplies - Warmest Birthday Wishes Card (felt mittens)
Paper: Stampin' Up! (Bashful Blue), Bazzil Basics (white).
Ribbon: Papertrey Ink (Pure Poppy).
Button: Papertrey Ink (Spring Rain).
Other: Stampin' Up! (linen thread), red and light blue felt, white embroidery floss, computer fonts (Honey Script, Times New Roman).

Supplies - Sending Birthday Wishes Card (felt tree)
Paper:
Stampin' Up! (Bravo Burgundy, Chocolate Chip, Autumn Vine DSP, Naturals Ivory), Basic Grey (Indian Summer - Acorn.
Stamps: Papertrey Ink (Everyday Button Bits).
Ink: Stampin' Up! (Chocolate Chip).
Ribbon: Stampin' Up! (Chocolate Chip), rick rack.
Felt Tree: Basic Grey (Indian Summer Woolies).

TUTORIAL: Pennant Banner

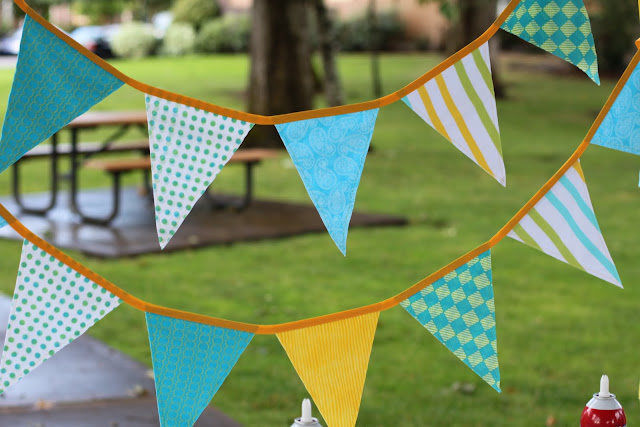
I finally squeezed in enough time to post the tutorial for the pennant banner / bunting I used for last month's ice cream party.  This is a great project for a beginning sewer, it's inexpensive, and it adds a ton of pop!

Supplies
  • Fabric. I used 1/4 yard cuts of 5-6 different patterns.
  • Extra wide double fold bias tape. 2-3 packs.
  • If you don't have a way to hang your banner, 2 wooden dowels, spray paint, and vases/pots filled with pea gravel or something else heavy.
  • Standard sewing supplies: thread, rotary cutter, straight edge, sewing machine.
1. Cut your fabric.
For this banner, I used six patterns of fabric.  When buying fabric, you'll need 1/4 yard eachTIP: Make sure you buy enough fabric to have 1/4  yard after it's squared.  If the fabric is cut crooked, you might want to buy 3/8 yard.  You do NOT need to prewash the fabric. 

The striped fabric on the left is a dishcloth I found at Target.  Since it's a big rectangle, I cut it the same way as the other quilting fabric.  (I bought additional dishclothes and used them as a table runner.)

Iron your fabric.  Fold your fabric in half wrong sides together so that the selvage edges are touching.  Square the top and bottom edges and cut off the selvage.  Cut your fabric 9" tall (1/4 yard).

Cut your pennants as shown above.  Each pennant is 9" tall (the height of your fabric) x 7" wide.  If it helps you to mark your fabric, start at one edge and mark along the top every 7".  Starting from the same edge, mark the bottom at 3 1/2", then continue marking every 7".  Use a straight edge and rotary cutter to make straight cuts.

Remember, you should be cutting through two layers of fabric.  As you cut your pennants, keep each pair of pennants stacked neatly on top of one another other so they're ready to be sewn together.

2. Sew each pennant.
Take your pennant triagles - each with a front and back piece of fabric, right sides facing out - and sew them together along the two long edges.  You'll sew the top together when you add the bias tape.  Sew close to the edge, about 1/4" - 3/8".  The exact measurement isn't important.  I moved my needle to its far right position and lined up the edge of the fabric with the edge of my presser foot.

TIP: Start at the top (where a long edge meets the short edge) and sew down to the bottom point.  When you get to the point, leave the needle in your fabric, then turn your fabric to sew along the other long edge.  This will give a nice, sharp point to your pennant.

You do NOT need to backstitch (staystitch) at the ends.  You'll catch these threads when you add the bias tape.

3. Sew the pennants together with bias tape.
Lay out your pennants in whatever arrangement you like.

I spaced my pennants 1" apart.  Feel free to adjust the spacing however you wish.  If you don't have a lot of fabric but need to fill a lot of space, spread your pennants farther apart.  Conversely, you could sew the pennants with the top edges touching so there'd be no space between them.

Pin each pennant inside the fold of the bias tape.  TIP: Leave a tail of bias tape on each end for hanging up the banner.  I left a 12" tail of bias tape.

Sew the bias tape onto the pennants.  Be sure to catch both the front and back layers of bias tape when you sew!

Your banner is done.  Admire it and smile!  If you need a way to hang your banner on a table, like I did, keep reading.

4. Prep dowels for hanging your pennant banner.
Cut your dowels to desired height, if necessary.

Use spray paint to paint the dowels.  I painted mine a sunny yellow to coordinate with my fabric.

Fill flower pots (or the container of your choice) with pea gravel.  Insert the dowels and hang your banner.

Enjoy your party!