Showing posts with label girly. Show all posts

Tuesday, June 28, 2011

Made for Charlotte: Mary Janes (Cute alert!)

These aren't your Grandma's baby booties.  These are stinkin' adorable!

Just look at them!  Little mary janes with a girly pink accent.  If ever I thought I wouldn't overindulge my daughter with shoes for every outfit, I'm doomed.  It doesn't help that my mom is such an enabler.  She's the crafty chica who crocheted these and all the other booties you'll see in this post.  Our conversations go something like this:

My mom: Ooh, I just bought the most velvety soft black yarn!  It'll be perfect for the shoes I'm making to go with the Christmas dress I bought for Charlotte!  (remember, it's June)  How about I make a pair to fit her now so you can see what you think?

Me: Um, heck yeah!  And by the way I just mailed five skeins of yarn for you to make shoes for Charlotte's summer outfits, too.

The indulgent grandmother type - I love it!  Thanks, Mom.

As for the velvety soft black mary janes, they arrived in the mail yesterday.  LOVE.

These white mary janes are one of the first pairs my mom made.

You can buy the patterns HERE, though my mom has started tweaking the design a bit, especially the straps.  Disclaimer: the day my mom bought and downloaded these patterns she got a virus on her computer.  Mom mom's tech-savvy enough not to do any risky clicking.  She says this was the only thing she can think of that might have affected her PC.  However, this etsy seller has a high, 100% positive feedback rating.  So obviously if this is how my mom got the virus, it's far from the norm.  Just something to consider.

This is the same pattern as the white booties, but in lavender.

Side view.  These patterns curve in and around the heel to help keep Baby from kicking them off.

These use the same pattern as the white and lavender shoes, but in pink.  My mom also embellished the toe box with little crochet flowers.

You can see why we're getting carried away with this shoe business.  :)  I just sent yarn for shoes in ivory, gray, brown, and light denim colors, plus red and pink yarn for lots of flowers, two-tone soles, and other girly accents.  I don't know when my mom will get tired of making these.  Maybe she already is.  But I sure am glad she's indulging me.

Monday, June 20, 2011

Charlotte's Nursery

This is my happy place.  It's clean and uncluttered.  It's feminine.  It's calm.  My husband and I put hours upon hours of love, sweat, and probably a few tears into preparing this haven for our daughter.  Now with the arrival of our sweet Charlotte Rose, the nursery is complete.

Allow me to show you around...

As I mentioned here, Charlotte's room is a knock-off of the Scallop Pique Nursery from Pottery Barn Kids.  You can read the DIY info for the wall stencil HERE.  The photo above shows the view from the doorway looking right.  The photo below pans around.  I think you'll see how the photos connect to show the layout of the room.

Framing the window is a pair of lavender Audrey Chenille Dot Panels from Pottery Barn Kids.  The bookshelf and lamp are from Target.  I've since added scalloped basket liners to the white wicker baskets, another feminine touch to continue the scallop theme in the room.

The ever-necessary diapering area and rocking chair.  Seriously, how many times am I here each day?  A dozen?  Seems like it, at least.

The baskets on the dresser are both from Pottery Barn Kids, though I couldn't find either on the PBK website.  I bought them in the store.

Isn't that doll adorable?  My boys like to hold it by the feet and swing it at each other, caveman club style.

I had new white cushions made for my rocking chair.  The old cushions were ivory, so not a match for Miss Charlotte's lavender and white nursery.  Before you gasp about white upholstery in a child's room, be assured that the covers are removable and I chose washable fabric (that I bought on sale for $10 per yard - score!).

Going back to the opposite wall, here is a closer look at the wall art.  Click HERE for more details about how I made each piece.

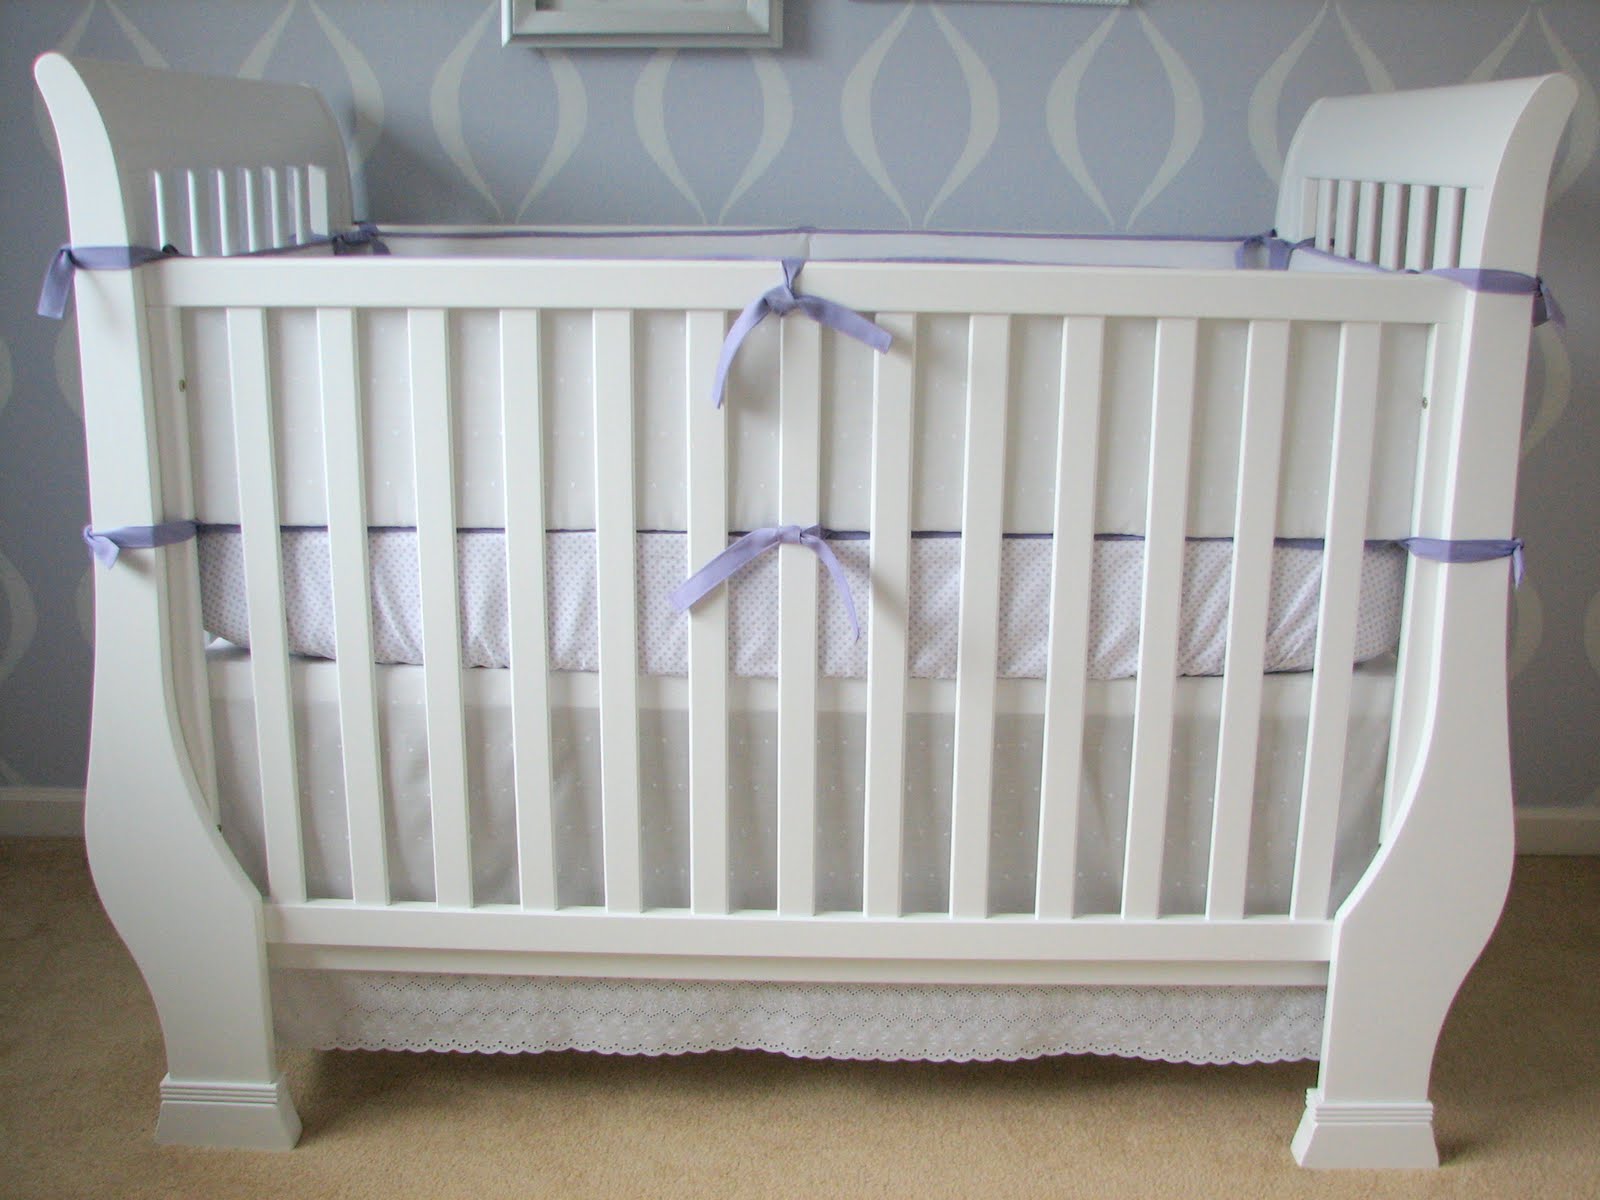
Click HERE for more details about how I made the crib bedding.

Still love the scalloped eyelet trim on the crib skirt.

For the finishing touch, we hung a crystal mini-chandelier.  As my six-year-old neighbor said, it looks like it was made for a princess.  My thought exactly.

Monday, May 30, 2011

Introducing Charlotte Rose

Charlotte Rose is here!
8 lbs. 10 oz.
20 3/4"

My sweet baby arrived and has a name: Charlotte.  This labor lasted longer than both of my previous labors combined.  But in the end I still got my healthy, beautiful daughter.  I'm absolutely smitten.

My mom is here cooking and cleaning, spoiling us rotten, and getting in as much snuggle time as I'll let her.  (I can't get enough of my baby, either, so I'm trying to share.)  My mom also showered us with handmade gifts for our sweet baby.  She made the afghan and hair band Charlotte's wearing in the photo - aren't they adorable! - plus plenty more crochet gifts that I'll get to show off later.

This little girl already has my husband wrapped around her little (and I mean little) finger.  I think he's having more fun putting her in all of her girly hair bands and such than I am.

For now I'm going to enjoy my baby and my family.

'Til later, Rachel

Tuesday, May 17, 2011

Baby Girl's Nursery: Crib Bedding

There's something calming about white.  Combine white with feminine details like scalloped eyelet trim and this crib set becomes a restful haven for my little girl.

I made all three pieces of the crib set: bumper, skirt, and sheet.  The crib sheet was so easy!  I can't believe I never knew about this.  I actually made two sheets - the one pictured is made with quilter's cotton.  I made a lavender flannel sheet as well.  Here's getting the word out, moms - if you're having a baby, pick your fabric and I'll gladly make a set of crib sheets as your baby gift.  Not only can you pick the most snugly soft fabric - or go with whatever style floats your boat - these sheets fit much better than the store bought sheets you have to muscle over the mattress corners.  If you're the DIY sewing type, I took the best from these two sets of instructions: HERE and HERE.  I used the measurements and French seam instructions from the Michael Miller tutorial, plus the all-around elastic idea from Dana's Made tutorial.

The crib skirt is made from white cotton eyelet.  Not only does the sweet scalloped edge mimic the scalloped pattern stenciled on the nursery walls, a prefinished edge means no trimming or hemming.  Beautiful AND easy.

The eyelet fabric was 45" wide (on the bolt).  One edge is scalloped.  The rest of the fabric is embroidered with tiny polka dots.  Since I only needed about 18" from the scalloped edge for the skirt, I had enough of the polka dot fabric left over to cover the outside of the bumper.

I made the ties using packaged quilt binding.  (It's essentially EXTRA, extra wide double fold bias tape.)  I cut the length I wanted (about 22"), turned under the short ends, stitched along all four sides, then sewed the finished tie to the bumper.

I made the bumper using these foam inserts from JoAnn.  I've read good reviews about them all over blogland.  So far so good from me, too.

The photo above shows not only the ties, but the piping I made and attached along the top of the bumper pads.  To make the piping, I covered cotton piping cord with prepackaged extra wide double fold bias tape, using the same brand and color that I used for the ties.

There you have it.  Crisp and clean with just the right pop of color to coordinate with the lavender walls.  Hopefully my little girl will love sleeping in it as much as I love looking at it.  :)

Wednesday, May 11, 2011

Baby Girl's Nursery: Wall Art

Last night Ben and I finished hanging the wall art in Baby Girl's nursery.  This was the last big thing I wanted to accomplish before her arrival.

I promise I'll post pics of the crib set and rest of the room soon.  :)  Consider this a sneak peek.

Also notice the stenciled scallops on the wall.  Yes, my husband is amazing.  He stenciled 250 scallops, give or take a few.  Once he hit his stride he could paint 10 per hour.  Yes, 10 per hour was the fast version.  So yes, he spent forever paining.  And yes, I love it!

The most meaningful piece of art is this trio of necklaces.  From left to right, you'll see my first string of pearls.  It was a gift from a dear family friend.  He is Chinese by birth, but developed a close friendship with my maternal grandparents, who sponsored him and his family to help them immigrate to the United States. We now consider Daniel and his family part of our own extended family.

Hanging on the middle necklace is a diamond pendant from my paternal grandmother.  I don't remember a time when Nan wasn't battling one of life's demons.  Her last years were spent fighting breast cancer, then lung cancer.  As a child from a poor family, she never thought she'd own anything as valuable as a diamond.  I'm especially flattered that she gave such a treasured heirloom to me.

The silver locket on the right belonged to my maternal grandmother.  She passed away last summer after 91 years of life.  There's so much to say. For the sake of posting this sometime this decade, I'm going to move along.

Next is this shadowbox.  I painted the frame silver, then covered a piece of white scrapbook paper with Prima flowers.  The flowers came dusted with iridescent glitter, which adds such beautiful dimension and subtle sparkle.

Buttons, pearls, and knockoff diamonds - what's a girl not to love?  All three pictures in this post show the background paper as a much brighter green than it really is.  Hmmm...maybe it's just not a good lighting day?  Very few are here in the rainy Pacific NW.  Anyway, I arranged dozens of white buttons, pearl brads, and tiny white flowers with rhinestone centers into a heart shape.  Attaching everything took less than an hour.  Not bad and totally worth it, eh?  The frame was a clearance find that I spray painted silver.

Finally, we have this pair of sparkly, beaded butterflies.  You'll have to click on the picture for a close up.  The butterflies are ready-made scrapbook embellishments - gotta love easy!  Yet it still adds just the right touch.

Stay tuned for the crib set!

Take care,  Rachel

Wednesday, April 20, 2011

Car Seat Cover + Canopy

Dear Princess,

Your chariot awaits.

Love,
Mom

I bought a car seat cover pattern on etsy.  I'm deliberately not linking to the pattern because, quite frankly, the pattern was horrible.  The listing mentioned that it was a one-size-fits-most type deal with only the strap marking being specific to my brand of car seat.  But I tell ya, I had to alter the car seat cover so much that it would have been easier to take apart my old car seat cover and use it as a pattern.  (I didn't do that because I was afraid that if I botched the project, I wouldn't have any cover for the car seat.)  Anyway, I'll chalk this up to a life lesson learned.  I'm happy with the final result and that's what matters.

The center portion of the cover is a visibly soft rosette minky.  The patterned fabric on the sides is Peacock Feathers in Sea Glass, from the Amy Butler Soul Blossoms collection.  If you look closely, you can also see that I made strap covers out of the pink minky fabric.

I made a coordinating canopy (tent?) to let my little girl sleep in peace.  I love the addition of the large pink ric rac around the edges.  The buttons on the handle are decorative.  Cute, eh?  The straps are actually attached with velcro.

I didn't follow one particular pattern when I made this.  Here are three free tutorials that I skimmed to get the general idea: here, here, and here.

Another shot showing the rounded corners (still love the ric rac!).  I also rounded the straps to match.

Here's the car seat clipped into the stroller.  The reason I bought this particular Amy Butler fabric was because it was the ONLY fabric I could find that incorporated the same green and aqua used on stroller.  Thank you, Amy Butler.

Another shot of the car seat clipped into the stroller, this time without the big canopy.  You can see how the Amy Butler fabric ties in with the stroller.

Brighton wanted me to take his picture.  I was more than happy to oblige.  :) 

Baby beware, this boy practiced driving your stroller all over our corner of the neighborhood.

If Brighton keeps driving like he did today, this girl's gonna be in for a WILD ride!

Thursday, March 24, 2011

Pottery Barn Kids Nursery Knock-off Part 1: Stenciling the Walls

ETA: The nursery is done!  Check out the finished room HERE.  You can also find details on my DIY crib bedding HERE and my DIY wall art HERE.

Thought I'd pop in to show you what my husband's been working on lately.  We're expecting a baby girl in May.  Hooray!  So my husband's been busy painting Baby Girl's nursery. 

We're doing a knock-off of this Scallop Pique Nursery from Pottery Barn Kids.

Look at what a great job Ben's doing with those walls!

The first order of business was painting the base color.  Pottery Barn Kids teamed up with Benjamin Moore to pick their paint colors, meaning that every paint color you see in PBK stores or catalogs is a Benjamin Moore paint color and can be purchased from a Benjamin Moore retailer.  Our local PBK store gave us a free pack of paint swatches.  We picked the swatch that matched the photo in the catalog (Iced Lavender), then took it to be color matched for a less expensive brand of paint at our local hardware store.

The next order of business was creating a stencil.  I bought a 10" x 18" stencil blank, a.k.a. stencil film, at JoAnn.  (Click here to purchase one from Amazon.com.)  Then Ben worked his magic to design this file on the computer.  You can click on the file, print, and enlarge it until it measures 10" x 18".  Note: You only need one dot between each of the parenthesis-looking things (that's an official term, right?).  Ben originally printed his design with two dots to help him align the images correctly, then changed his mind once he realized he'd need to use a level anyway.

Ben designed the stencil, then printed the design on computer paper.  It printed onto two pages, which Ben taped together.  Sorry that I don't have a picture of this, but Ben placed the stencil blank on top of the printed design, then used an X-acto knife to cut through the stencil film, creating his stencil.  If these instructions are as clear as mud, click HERE to see a video from PBK about making your own stencil, paying special attention around the 1:00 mark.

Now our walls look like this.  Okay, really they look much more lavender than in this photo.  (See the photo of Ben near the top of the post.)  And this was as much of the wall as I could squish into the photo.  One day I'll figure out the whole lighting/wide-angle lens thing.  Still, you can see that my husband did a stinkin' awesome job on the stenciling.

Stay tuned for my DIY crib bedding.

Monday, March 29, 2010

Baby Love Bunny


I brought out this fuzzy felt bunny to make an Easter card, but ended up making a card perfect for a baby girl. The ribbon even has "baby girl" printed on it in chocolate brown and soft pink.


TIP: I also wanted to share a tip for altering the size of your die cuts. I love my scalloped rectangle Nestabilities, but sometimes they don't fit the embellishment I want to use. Here's how I took my rectangle die and adjusted the shape to fit my felt bunny.


First, I used the die to cut my paper into a scalloped rectangle. Then I lined up my paper so that the scallops fit the grooves on the die AND the edge of the die was where I wanted to make a new edge for my paper. The photo above shows a view of the top...


...here's a view of the bottom.


Then I ran the die and paper through my die cut machine a second time. Here's what my die cut looked like coming out of the machine. (Hopefully you can make out the shape through my much-used cutting mat.) I simply tossed the paper remnant into my recycling bin, leaving a scalloped shape custom made for my little bunny. Easy peasy!

We're dying Easter eggs tonight. Hope you're doing something fun, too!

Supplies
Stamps: Stampin' Up! (Noteworthy).
Ink: Stampin' Up! (Chocolate Chip).
Paper: Stampin' Up! (Kraft, Whisper White), My Mind's Eye (Tiny Dancer "Chasse" Graceful Circles Paper, Tiny Dancer "Ballet" Dancing Circles Paper).
Felt Rabbit: Martha Stewart.
Ribbon: American Crafts.
Punch / Dies: Rectangle Nestabilities, Stampin' Up! (scallop border punch, corner rounder).
Other: white sewing thread.

Wednesday, October 21, 2009

Magical Birthday Card


Have I mentioned lately that I love making gifts for girls? Brighton was invited to a "Magical Birthday Party." Here's our card for the sweet six-year-old.

All of the patterned papers are shimmery, paired with shiny foil chipboard Thickers. Love those sparkly, swirly letters! The patterned papers are actually Christmas papers - I just cut off the Christmas trees and reindeer and holly jolly stuff. Even the Thickers are from American Crafts' holiday Tinsel line. I just love it when I can multi-purpose things like that. Makes me feel clever - LOL. :)

Off to wrap a present...

Supplies. Paper: SU! (Pretty in Pink, Pink Pirouette), KI Memories (Joyful line of patterned papers). Stamp: PTI (Everyday Button Bits). Ink: SU! (Basic Black marker). Brad: SU!. Chipboard Letters: Cricket Tinsel (American Crafts). Ribbon: Offray.

Monday, October 12, 2009

One Little Baby...Many Happy Hearts


Who doesn't love making baby gifts? And if you're like me and only have boys, the opportunity to make something for a baby girl is even better!

A family friend recently welcomed a new daughter. I happened to know when the happy family was coming home, so I hung this banner on their front door, ready to greet them. It reads, "one little baby - many happy hearts." You may have to click on the enlargement to read it.


Aren't those papers yummy! I bought nearly the entire line from My Mind's Eye knowing I'd find a use for them sometime. A week or so later - I get to make a gift for a baby girl! Congratulations to the happy family. :)

Supplies. Paper: My Mind's Eye (Deena's Penny Lane), SU! (Pink Pirouette). Punches: SU! (scallop circle, scallop border). Ribbon: SU! (Pretty in Pink). Other: Thickers, by American Crafts.